Planning and Design for a Thatch Roof Project
Assessing Feasibility and Regulations
South Africa’s thatch roofs grace savannah farms and coastal towns, and yet about 40% falter at the feasibility stage. Before a single reed is laid, planning and design for a thatch roof project must account for site orientation, climate, and local regulations. A clear scope balances aesthetics with longevity, followed by mapping key constraints.
- Planning approvals and zoning checks
- Fire safety requirements and material treatments
- Heritage overlays or conservation constraints
- Budget realism and long-term maintenance expectations
Feasibility is broader than blueprints; it threads fire codes, insurance, and environmental conditions. The path for thatch roof diy begins with a clear understanding of regulatory constraints and a realistic maintenance horizon. Findings are translated into a design brief that respects wind behavior, moisture control, and the hand-crafted character of reed work.
Choosing Thatch Materials and Roof Styles
A well-planned thatch roof diy pays dividends in durability and character. In South Africa, about 40% of projects stall before a single reed goes up, so design from the start matters. The choice to pursue thatch roof diy hinges on clarity.
Start with site orientation and climate. Map wind paths on the roof and note sun exposure to shape insulation. Regulatory checks—planning approvals, zoning, and fire safety—set boundaries; a clear design brief translates wind, moisture, and craft.
Choosing thatch materials and roof styles follows. Cape reed offers durability; water reed gives a finer texture; long-stem varieties suit low-maintenance themes.
- Cape reed for rugged durability
- Water reed for texture and lighter weight
- Long-straw thatch for tighter, modern lines
Roof style decisions: open thatch with visible batten lines, or closed systems with tighter cap. The hand-crafted character shines in how reeds are laid, tied, and vented. That craft shows!
Estimating Costs, Timeline, and Labor
Launching a thatch project with a tight plan is not optional; it’s the secret insulation against chaos. A focused brief and a realistic timeline turn cape reed dreams into a roof that actually goes up. Without momentum, even great craft stalls while the wind drafts and costs rise.
Think of the plan as a blueprint for costs, schedule, and labor—without the mystery. Pin down material quantities, scaffold needs, and delivery windows, then build in a buffer for weather and curing. The aim is a smooth flow from first cut to final tie.
- Cost: itemize materials, scaffolding, transport, and a prudent contingency.
- Timeline: map ordering, delivery, and curing windows with weather buffers.
- Labor: define roles and safety, choosing in-house, subcontractors, or a hybrid.
This is the heart of thatch roof diy—planning with clarity, budgeting bravely, and honoring skilled hands.
Sourcing Materials Responsibly
Planning for a thatch roof project feels like charting a voyage rather than ticking boxes. A thoughtful sourcing strategy is the compass that keeps storms at bay and timbers honest. “We don’t just harvest straw and reed,” a seasoned South African thatcher says, “we harmonise with the season.” For thatch roof diy, sourcing materials responsibly isn’t optional—it’s part of the craft, shaping durability, colour, and character from first cut to final tie.
Think global ethics, local advantage. Map suppliers who practice sustainable harvesting, support small farms, and supply pest-free thatch. Consider reclaimed bindings and offcuts to minimise waste and celebrate history.
- Local suppliers and cooperatives with transparent provenance
- Reclaimed thatch and traditional bindings
- Certified, pest-free drying and storage practices
Design-wise, align roof form with climate, drainage, and maintenance cycles. Let the sourcing plan breathe within the overall design narrative and timeline, balancing aesthetics with availability and impact.
Safety Planning and Insurance Considerations
Planning a thatch roof diy in South Africa isn’t a whimsy; it’s choreography with the weather. You map drainage, maintenance windows, and seasonal lull periods before a single reed is tied. A veteran thatcher sums it up: “Plan with the sun in mind, and you’ll get years of drama-free thatch.”
Safety planning and insurance considerations aren’t optional—they’re the ballast. Draft a site-wide safety plan, assign competent supervision, and lock in insurance that travels with the project: public liability, contractor’s all-risk, and materials in transit. In SA, check that policies cover weather-related damage and theft of binding offcuts. This is where the romance of design meets the realism of risk.
- Site safety plan and access controls
- Qualified supervision, training, and PPE compliance
- Public liability and builder’s risk coverage for roof work
With this foundation, the design and planning weave together—a practical romance where form meets weather and safety keeps the dream dry.
Materials and Techniques for Traditional Thatch Roofing
Thatched Material Types and Their Pros and Cons
South Africa’s thatch roofs fuse folklore with climate smarts, often staying cooler than tile on a blazing afternoon. A well-chosen material and a respectful touch with the thatching technique turn a roof into a living asset that ages gracefully and earns a nod from the neighbourhood.
Thatched material types span long straw, reed, and grass blends, each with its own personality and price tag.
- Long straw: durable, excellent insulation; requires careful maintenance and a higher upfront cost.
- Reed: dense, superb weatherproofing; heavier and pricier to source and install.
- Grass blends: lighter and quicker to lay; lifespan hinges on climate and upkeep.
Technique matters as much as material. Proper layering, wind-binding, and a solid ridge cap keep rain out and thatch in peak shape—no wizards required. For thatch roof diy ambitions in South Africa, align your method with local climate and available resources.
Rafter Preparation and Roof Structure
Sun-scorched roofs across South Africa whisper of a living legend: a well-rung thatch roof diy can temper heat and lend grace to any home. A striking stat from housing surveys notes cooler interiors beneath thatch on blazing days. Here, rafter preparation and a solid roof frame form the quiet spine that lets the myth breathe and the structure age gracefully.
Rafter preparation and roof structure honor load, wind, and drainage. Picture rafters as the shelter’s spine—timbers true, joints secure, and a steady ridge cap. A careful mix of rafters, ridge support, wind-binding, and breathable battens forms the quiet frame for thatch roof diy to endure.
- Rafter timbers with consistent spacing
- Ridge beam or strong ridge support
- Wind-binding to resist uplift
- Breathable underlayers to shed moisture
With climate and local timber in mind, the frame becomes a sanctuary that wears age gracefully while letting the thatch breathe and sing.
Underlayment, Battening, and Waterproofing
Across South Africa, shade and shelter mingle on the roofline. Thatched roofs, crafted with intention, offer cooler interiors and quiet grace. For the materials and techniques behind underlayment, battening, and waterproofing, thatch roof diy projects stay breathable yet watertight.
Underlayment choices balance moisture and airflow.
- Breathable membranes, reed mats, or hessian create a moisture break
- Lightweight mesh deters pests and supports ventilation
- A slim damp-proof layer protects timber
Battening forms the spine of the roof. Treated timber battens resist decay, and spacing is tuned to thatch thickness and winds, letting the roof breathe while offering steady support.
Waterproofing centers on ridge work and surface protection. Limewash or wax-based sealants offer breathability, while well-designed ridges shed rain and protect against storms—crucial considerations for sustainable thatch roof diy.
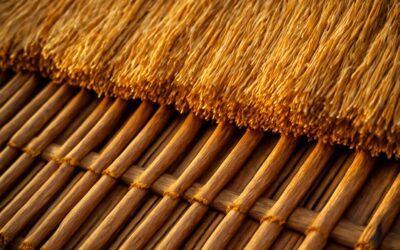
Application Techniques: Bundling, Binding, and Layering
In the South African sun, a well-placed thatch roof diy project can cool interiors and turn heads. Bundling, binding, and layering are the quiet choreographers behind thatch’s breathability and rain-shedding charm.
Bundling is density in motion—thatch stalks gathered into compact bundles that read as tiny weather shields. Traditional form favors insulation without choking airflow.
- Dense, compact bundles for insulation without sacrificing breathability
- Natural binders like coir or sisal to secure without stiffness
- Overlap patterns that balance wind resilience with drainage
Binding anchors the bundles to the battens with coir, sisal, or light wire—secure yet breathable restraint that keeps weather at bay while moisture can escape.
Layering creates overlapping courses that shed rain along the slope. The rhythm from base to crown influences longevity and the roof’s texture; these ideas echo through SA thatch roof diy communities.
Ridge Finishes and Weatherproofing
South Africa’s thatch-roof heritage is a living weather diary; every ridge is a memory of sun, wind, and rain. For the hands-on reader, thatch roof diy is a saga where craft meets climate—patient, lyrical, and intensely practical.
The ridge finishes are the crown. They combine combed thatch with breathable binders that resist rain while letting moisture escape. Natural materials like coir or sisal binders, and a slim wire lattice, create a cap that sheds water without stifling breathability.
- Coir or sisal binder for flexible, breathable joints
- Natural lime wash or clay-based sealant for exterior weatherproofing
- Spiral ridge cap made from thatch reinforced with a braid
Step-by-Step Application Process for Thatch Roofing
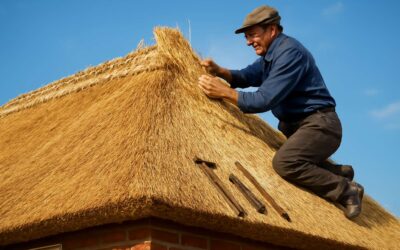
Site Setup, Access, and Safety Protocols
Site setup for a thatch roof project is as much about respect as it is about technique. “Discipline is the bridge between goals and achievement,” and in South Africa a clear access corridor, a stable working surface, and wind-aware scheduling keep crews focused and safe. Set up demarcated zones, portable lighting, and a communication plan before any bundle is lifted!
- Establish a dry, stable access trail and remove loose debris
- Secure ladders, scaffold, and guard rails with a competent team
- Brief all participants on PPE, weather awareness, and emergency signals
With access secured, the crew follows a measured sequence, keeping wind, sun, and moisture in balance. This is where discipline meets craft; thatch roof diy carries a moral compass as much as a manual, and every breath on the scaffolding matters, with SA safety standards guiding every step.
Installing the Roof Deck and Lath
Out of the wind, a thatch roof diy unfolds as the deck and lath come to life beneath the hands of patient craftsmen. The air carries the scent of sap and soil, and a quiet confidence settles over the scaffold as plans settle into timber. Every plank—gleaming bronze in the sun—speaks of weather, weight, and whispers of tradition.
One moves with measured grace: the deck forms a sturdy stage, then the lath follows, aligned with the horizon and secured by careful hands. The rhythm is deliberate, the surface true, and the craft remains a dialogue between shelter and sky, where the grain guides every knot and the loom of daylight threads through every seam.
This is craft as a living myth—taut with responsibility, bright with sun, and anchored in South Africa’s enduring spirit of workmanship.
Applying Thatch Layers and Bindings
Firelight and wind share the same breath when you begin the applying step of thatch layers and bindings in South Africa’s sun-drenched landscapes. In this phase, each reed and blade is coaxed into a balanced quilt, and the roof takes on a quiet rhythm of weight and shelter. This is thatch roof diy speaking to place and memory.
Directives and craft mindset align with rhythm.
- Layering from eave to ridge with consistent overlap to shed rain.
- Binding with tight, evenly spaced wraps to resist wind uplift.
Patience binds form and wind into a durable silhouette, a humble covenant with the South African sky.
Ridge Construction and Finishing Touches
Ridge construction crowns the thatch roof with a quiet bravado—where design surveys wind and light. The apex becomes a compass, guiding the roof’s line toward the South African horizon. Craftspeople test balance, choosing cap shapes that shed rain while catching the sunset. Finishing touches whisper of patience, letting the ridge glow softly as the afternoon heat settles along the eaves. In this moment the roof speaks of place and memory, a refined cadence that makes the home feel both timeless and alive!
- Ridge cap design and silhouette alignment
- Strategic apex fusing final thatch layer with the crown
- Wind-resilient bindings or cap fastenings for durability
- Weatherproofing details and decorative touches to finish
That careful sequence is what makes thatch roof diy resonate with rhythm and resilience.
Edging, Drip Edge, and Water Shedding
In the realm of South Africa thatch roof diy, edging and drip edges stand as sentinels against rain’s march. When the crown sheds rain with grace, the roof holds its line—sunset pink on the eaves and the thatch breathing dry and steady. A water shed saves time and memory, letting the roof keep its story bright long after the sun slips away.
- Prepare the lip: trim and align the eave edge so water is steered away from the finish.
- Fit the drip edge: a galvanized strip along the eaves to channel runoff; secure with corrosion-resistant nails.
- Edge binding: tension and wrap the final thatch roof diy edge with a stout twine or copper wire to seal flutter.
- Water test: a light spray along the eave checks shedding, adjust as needed.
With these steps, the edge becomes a hinge that keeps rain from returning to the weave, embodying thatch roof diy craft, preserving beauty and longevity.
Maintenance, Repairs, and Longevity of Thatch Roofs
Routine Inspections and Seasonal Checks
Across South Africa’s varied climates, a thatch roof built to last is a living story. For hands-on homeowners, thatch roof diy isn’t a trend—it’s a tradition of care. A season of careful checks can double a roof’s life, if done with intention.
Routine inspections and seasonal checks catch wear before it escalates into costly repairs.
- Inspect the ridge and bindings for loosened thatch
- Clear debris from gutters and eaves
- Look for damp patches after rains
- Assess underlayment and battens for rot or insect damage
Small repairs—rebinding loose sections, patching bare spots, and resealing joints—extend life and keep pests at bay. In South Africa’s varied seasons, tackling these tasks after storms and before winter preserves the roof’s integrity and value.
Common Repairs: Patchwork and Re-Thatching vs Patching
Maintenance, Repairs, and Longevity unfold like braided reeds across a thatch roof—soft resilience against a South African sky. In the realm of thatch roof diy, the tale is not age but care, a patient vigil that translates wear into wisdom. Each season tests the weave, and yet the roof remains a living poem of craft and climate!
- Patchwork and rebinding to stabilize loosened sections and protect bindings
- Re-thatching when losses widen the weave beyond the patch’s reach
- Patching bare spots and resealing joints to deter pests and moisture
In the realm of longevity, balance—between tradition and contemporary safeguards—fuels the story. A roof that breathes with attention ages with quiet dignity, its rhythm echoing the years of South Africa’s seasons, from drought to downpour.
Mold, Moss, and Pest Control
Maintenance and repairs are patient vigils, not dramatic rescues; a craftsman tends the work with a patient gaze! Mold lingers in damp corners; moss threads green lace across shaded swells; pests probe the bindings where moisture gathers. A roof that breathes, tended with quiet attention, ages with dignity through drought and downpour, its rhythm a poem to craft and climate.
- Moisture marks: dark patches, musty smells, or damp timbers
- Moss growth: dense patches on ridges and shaded slopes
- Pest indicators: nibbling, frass, or sudden noise in the eaves
Longevity asks for balance between tradition and safeguards. When attention is consistent, the thatch roof stands as a living relic under South Africa’s skies. This is the ethos of thatch roof diy.
Preventive Maintenance and Cleaning
Maintenance is a patient art that ages with the roof, not a dramatic rescue. In the realm of thatch roof diy, longevity arrives through steady, thoughtful care: wipe away debris in the dry season, give the seams a light once-over, and ensure ventilation remains lively enough to let the cavity breathe under sun and storm. Dark patches and musty smells become stories of the past when attention is constant and gentle!
These touchpoints guide ongoing care:
- Ridge line stability and binding integrity
- Moisture pockets near eaves and joints
- Ventilation and airflow beneath the thatch
Longevity asks for balance between tradition and safeguards. When attention is consistent, the roof becomes a living relic under South Africa’s skies, aging with dignity through drought and downpour—quiet, resilient, a poem of craft and climate.
End-of-Life Options and Recycling
Maintenance is not a drama; it’s a habit. In the world of thatch roof diy, ridge line stability, moisture pockets near eaves and joints, and ventilation beneath the layers are the quiet guardians of longevity. Regular checks keep dark patches and musty smells from stealing the show.
Longevity grows where tradition meets safeguards. When care is steady, the roof ages with dignity under South Africa’s sun and rain, a stubborn craft enduring drought and downpour alike. End-of-life options and recycling keep the cycle honest and nature-friendly.
- Composting or mulch from mature thatch to enrich gardens
- Upcycling into landscape features or craftwork
- Eco-friendly recycling streams that recover natural fibers
These paths honor the craft and the climate, closing the loop without leaving litter.


0 Comments